If you've had fun with Docker containers, I now introduce you to Kubernetes and wish you the best of luck. I'm still learning myself! I decided to install IBM Cloud Private Community Edition following the Installation guide at IBM's Knowledge Center.
IBM Cloud Private Community Edition (ICP-CE) assembles a lot of open source components to (hopefully) make Kubernetes (sometimes shortened to K8s) easier to manage. In addition, ICP-CE provides a web console UI and added features for authentication, security, metering, logging and much more. Name dropping: Project Calico, CoreDNS, Prometheus, Grafana, Elasticsearch-Logstash-Kibana (ELK), Helm, Istio, etc.
Installation
I installed ICP-CE from the "ICP inception" image from Docker Hub in a VirtualBox VM running Ubuntu. I'm not going step-by-step like I normally do. This post is more so that I remember what I did and less focused on you, dear reader!
I couldn't use Parallels Desktop Lite because I needed to over-commit CPUs in order for ICP to boot up - 6 virtual cores is a must, though your host can have fewer cores (4 in my case).
Setup VirtualBox VMs
First, download the Ubuntu Server 18.10 ISO.
Under VirtualBox Preferences.., > Network, create a new NAT Network, called "icp-network":

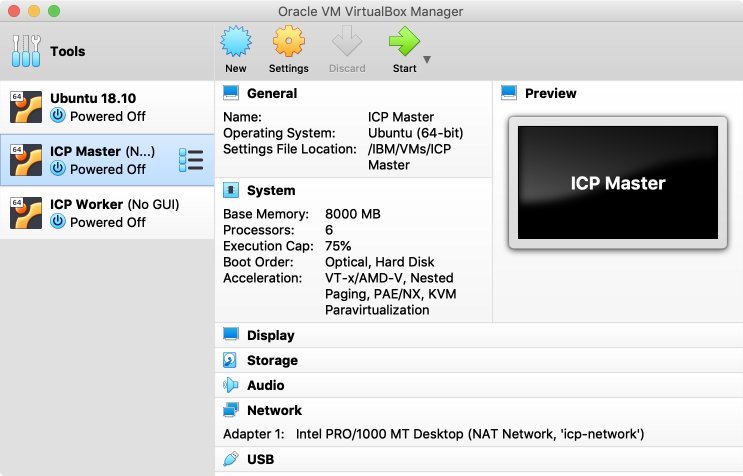
Create a new Machine called "ICP Master", with the settings in the table below. Make sure to attach to the "icp-network" above and mount the Ubuntu ISO. Start the VM and perform a standard Ubuntu installation - nothing specific required here. Repeat, for a single "ICP Worker" node.
| Hostname | CPU | Memory | HDD |
|---|---|---|---|
| icp-master | 6 cores, execution cap 75% | 10 GB | 20 GB |
| icp-worker | 1 core, execution cap 75% | 1.5 GB | 10 GB |
Installing the Master (and Worker)
Once both the VMs are up and running, log in to the Master node - since we installed Ubuntu Server, there is only the console and no desktop GUI. Make a note of your IP addresses, mine were 10.0.2.4 for the master and 10.0.2.5 for the worker. I also edited /etc/hosts on both machines, adding:
10.0.2.4 icp-master
10.0.2.5 icp-worker
Install Docker CE for Ubuntu following the docs:
curl -fsSL https://download.docker.com/linux/ubuntu/gpg | sudo apt-key add -
sudo add-apt-repository "deb [arch=amd64] https://download.docker.com/linux/ubuntu $(lsb_release -cs) stable"
sudo apt-get install docker-ce docker-ce-cli containerd.io
Then, install ICP-CE and extract the data folder into a cluster folder:
sudo mkdir /opt/icp-ce
cd /opt/icp-ce
sudo docker run -e LICENSE=accept -v "$(pwd)":/data ibmcom/icp-inception:3.1.2 cp -r cluster /data
Setup passwordless SSH, and copy the key to the worker node - you will be prompted to enter your worker node OS password:
ssh-keygen -b 4096 -f ~/.ssh/id_rsa -N ""
sudo cp ~/.ssh/id_rsa ./cluster/ssh_key
ssh-copy-id -i ~/.ssh/id_rsa.pub osadmin@10.0.2.5
Edit the ICP configuration in /opt/icp-ce/cluster/config.yaml to:
- Set the ICP username and password (here shown as "admin")
- Set the worker node OS username and password (here shown as "osadmin")
- Use
python3instead ofpython - Change the password policy to allow "admin" without special characters.
- Change loopback setting to
loopack_dns: trueto allow installation to continue without figuring out DNS - And, disable unneeded Management Services to reduce footprint.
default_admin: admin
default_admin_password: admin
ansible_user: osadmin
ansible_ssh_pass: osadmin
ansible_become: true
ansible_become_password: "{{ ansible_ssh_pass }}"
ansible_ssh_common_args: "-oPubkeyAuthentication=no"
ansible_python_interpreter: /usr/bin/python3
password_rules:
 - '(.*)'

loopback_dns: true

management_services:
  istio: disabled
  vulnerability-advisor: disabled
  storage-glusterfs: disabled
  storage-minio: disabled
  platform-security-netpols: disabled
  node-problem-detector-draino: disabled
  multicluster-hub: disabled
  multicluster-endpoint: disabled
  custom-metrics-adapter: disabled
  image-security-enforcement: disabled
  metering: disabled
  logging: disabled
Edit the hosts file in the same folder, for one master and worker+proxy, i.e.:
[master]
10.0.2.4

[worker]
10.0.2.5

[proxy]
10.0.2.5
Install ICP-CE
Whenever possible, shutdown and take VM Shapshots for easy rollback.
Now that the prerequisites are met, start the install - this will take a long, long time, and will install both the master and worker nodes (hence the need for SSH to be setup above):
cd /opt/icp-ce/cluster
sudo docker run --net=host -t -e LICENSE=accept -v "$(pwd)":/installer/cluster ibmcom/icp-inception:3.1.2 install
Take note of any fatal / error messages shown in red.
IF you reach the end of the installer, you should see something like this:
PLAY RECAP *********************************************************************
10.0.2.4       : ok=102  changed=58   unreachable=0   failed=0
10.0.2.5       : ok=196  changed=126  unreachable=0   failed=0
localhost      : ok=259  changed=161  unreachable=0   failed=9

POST DEPLOY MESSAGE ************************************************************

The Dashboard URL: https://10.0.2.4:8443, please use credentials in config.yaml to login.

Playbook run took 0 days, 0 hours, 57 minutes, 14 seconds
It's a good idea to shutdown, take a snapshot, restart and make sure everything starts up ok.
Login to the ICP console
Now one should be able to login to the mater node console at https://10.0.2.4:8443.
Here's the gotcha - since I set up "NAT Network", my Host OS (macOS) could not communicate with the guests. In my case I created yet another Ubuntu VM and installed a Window Manager and Firefox. You could probably install the same on either the worker or master node.
This will be over 1.4GB of downloads to install:
sudo apt install xubuntu-core
sudo apt install firefox
I also installed the VM guest additions (Devices > Insert Guest Additions CD Image..) and Microsoft Visual Studio Code:
wget -q https://packages.microsoft.com/keys/microsoft.asc -O- | sudo apt-key add -
sudo add-apt-repository "deb [arch=amd64] https://packages.microsoft.com/repos/vscode stable main"
sudo apt install code
Notes
You can only run the kubectl commands after Kubernetes is installed and running, but while the ICP-CE installation is still in progress.
In my install, I have to explicitly run kubectl as root specifying the config file, so for convenience, I created an alias in my .bash_profile:
alias kubectl=`sudo kubectl --kubeconfig=/var/lib/kubelet/kubectl-config -n kube-system`Monitoring installation progress
To check what's installed and running, run kubectl get pods:
NAME                     READY  STATUS   RESTARTS   AGE
image-manager-0          2/2    Running  0          3m51s
k8s-etcd-10.0.2.5        1/1    Running  0          4m36s
k8s-kmsplugin-10.0.2.5   1/1    Running  0          3m49s
k8s-master-10.0.2.5      3/3    Running  0          4m14s
k8s-proxy-10.0.2.5       1/1    Running  0          4m23s
This list will get longer and longer as more containers are spun up.
Waiting to start due to download errors
Since the installer is pulling images from Docker Hub, a slow or bad download may cause the installer to seem to get stuck waiting for something to start:
TASK [waitfor : Waiting for MongoDB to start] ********************************
FAILED - RETRYING: Waiting for MongoDB to start (100 retries left).
FAILED - RETRYING: Waiting for MongoDB to start (99 retries left).
To check if it's merely a download issue (that should resolve itself after retrying):
- First, run
kubectl get podsto check the status of the pod - in my caseicp-mongodb-0STATUS wasInit:0/2. - Then,
kubectl describe pod icp-mongodb-0to check last few logged events. - If you see
Failed to pull image, then just wait a while. Hopefully after it re-tries, you'll seeSuccessfully pulled imagefollowed byCreated containerandStarted container.
kubectl get pods
kubectl describe pod icp-mongodb-0
However, you might see some other error...
Waiting to start due to resource issues
Here's another example I faced:
TASK [waitfor : Waiting for auth-pdp to start] ********************************
FAILED - RETRYING: Waiting for auth-pdp to start (100 retries left).
FAILED - RETRYING: Waiting for auth-pdp to start (99 retries left).
If, on further inspection with kubectl describe pod auth-pdp, you get:
Type     Reason            Age                   From               Message
----     ------            ----                  ----               -------
Warning  FailedScheduling  52s (x26 over 6m47s)  default-scheduler  0/2 nodes are availble: 1 Insufficient cpu, 1 Insufficient memory, 1 node(s) didn't match node selector.
Then, you don't have enough CPU or memory - allocate more... or just give up!
Waiting all services
The last thing I got prior to the installer completing was TASK [Waiting for all services in running status] ***** and I realized a whole bunch of stuff was not running. Check kubectl get pods | grep Pending:
monitoring-grafana-xxx-xxx      0/3 Pending
monitoring-prometheus-xxx-xxx   0/4 Pending
At this point, I think ICP-CE is installed, but there aren't CPU or memory resources to get these processes running. After a while the installer seems to continue, after waiting a bit...
Anyone, once the server is restarted, since there still isn't sufficient CPU or memory, just stop the deployments that aren't mandatory to ICP-CE. First, check on what's deployed:
kubectl get deployYou'll get a long list like this:
NAME                         DESIRED    CURRENT    UP-TO-DATE    AVAILABLE    AGE
calico-kube-controllers      1          1          1             1            21d
custom-metrics-adapter       0          0          0             0            21d
default-http-backend         1          1          1             1            21d
heapster                     1          1          1             1            21d
helm-api                     1          1          1             1            21d
helm-repo                    1          1          1             1            21d
ibmcloud-image-enforcement   0          0          0             0            21d
Then, stop whatever you think you should. I did:
kubectl scale --replicas=0 deploy/monitoring-prometheus-kubestatemetrics
kubectl scale --replicas=0 deploy/monitoring-prometheus-elasticsearchexporter
kubectl scale --replicas=0 deploy/monitoring-prometheus-collectdexporter
kubectl scale --replicas=0 deploy/monitoring-prometheus-alertmanager
kubectl scale --replicas=0 deploy/monitoring-prometheus
kubectl scale --replicas=0 deploy/ibmcloud-image-enforcement
kubectl scale --replicas=0 deploy/custom-metrics-adapter
kubectl scale --replicas=0 deploy/metrics-server
High CPU/memory with CoreDNS
If you find coredns eating resources (run top and check what's the first item on the list with high CPU and / or memory utlization), then the DNS is in an infinite resolving loop. Go read the documentation, when DNS server validation fails.
Honestly I'm not sure what works. For me, the fix was to use a public DNS instead - this will likely affect the internal applications but I'm just trying to get the system started:
kubectl edit cm kube-dnsEdit the YAML config file, replacing proxy . /etc/resolv.conf with:
proxy . 8.8.8.8Perhaps also edit /etc/resolv.conf to point to a public DNS and avoid 127.* nameserver issues:
nameserver 1.1.1.1Since I was too lazy, I just killed the CoreDNS process (kill -9) to force Kubernetes to re-start it.
Conclusion
That was many hours of my life gone...