I have been using UTM on M1/M2 macs for all my virtualization needs for a while, but never posted much because it practically works out of the box. Since around October 2022, UTM v4.0.9 on macOS Ventura allows Apple Hypervisor Virtualization Virtual Machines to use Rosetta 2.
Aside: I also use Ubuntu Multipass on M1 macs, including to run x86 containers. However, at this time, I don’t think Multipass, which uses QEMU, supports Apple Virtualization yet.
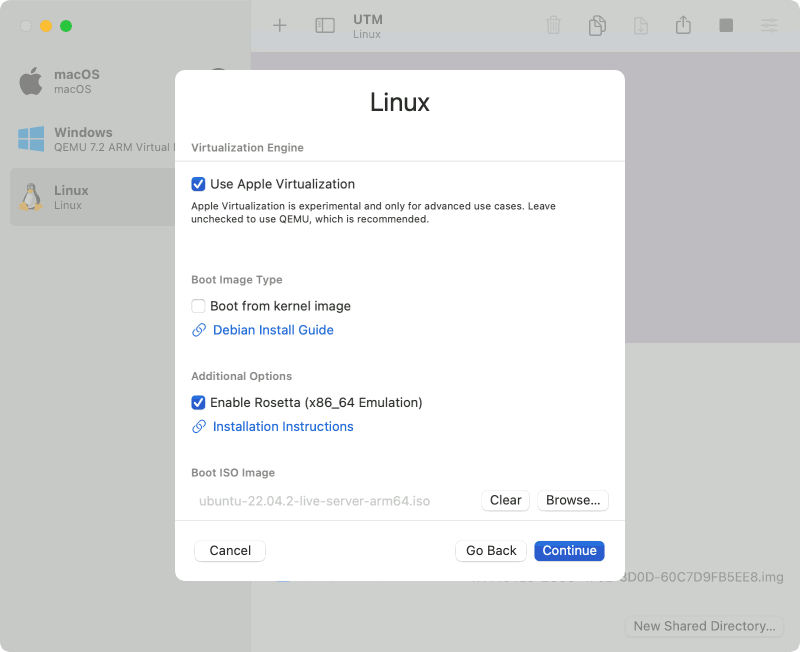
Creating a VM
Goes without saying you need an M1/M2 mac running macOS 13 Ventura or later, and Rosetta must be installed, e.g. softwareupdate --install-rosetta.
First up, install UTM, which currently is at v4.1.6 (75). Then:
- From the File menu > New...
- Select Virtualize > Linux
- Make sure to check “Use Apple Virtualization” and “Enable Rosetta (x86_64 Emulation)”
- Download your Linux ISO choice, I’m using Ubuntu Server for ARM 22.04.2 LTS
- You may add a Shared Directory, although I do that later.
- And, complete the Linux installation as usual.
Remote Shell
You can skip this, but everything is so much easier if copy-and-paste works...
The UTM documentation for Linux is not explicit about this, but the SPICE Guest Tools agent requires X11 and is no use on a Ubuntu server install. So, no copy-and-paste, even if you install the agent.
One solution is to run the VM headless by removing the display device and adding a serial device for the terminal. On macOs, screen can be used to connect via serial port.
But for me, I just enable OpenSSH server (and in fact, docker, but more on that later) during the Ubuntu installation. To determine VM’s IP without logging in, I add this second line to /etc/issue which matches what ever the post-login message displays as my network interface:
Ubuntu 22.04.2 LTS \n \l
eth0: \4{enp0s1}
Now I can ssh user@[ip].
Setup Rosetta
Next, enable Linux to use Rosetta for x86 ELF binaries. I’m just regurgitating:
sudo mkdir /media/rosetta
sudo mount -t virtiofs rosetta /media/rosetta
sudo apt install binfmt-support
sudo /usr/sbin/update-binfmts --install rosetta /media/rosetta/rosetta \
 --magic "\x7fELF\x02\x01\x01\x00\x00\x00\x00\x00\x00\x00\x00\x00\x02\x00\x3e\x00" \
 --mask "\xff\xff\xff\xff\xff\xfe\xfe\x00\xff\xff\xff\xff\xff\xff\xff\xff\xfe\xff\xff\xff" \
 --credentials yes --preserve no --fix-binary yes
Then, edit /etc/fstab as root, and add rosetta /media/rosetta virtiofs ro,nofail 0 0 so that it’s automatic from now on.
Then, make sure Ubuntu’s package manager knows where to find x86_64 binaries, per [macOS-Linux-VM-with-Rosetta](https://github.com/diddledani/macOS-Linux-VM-with-Rosetta]. Edit /etc/apt/sources.list by duplicating the ARM lines and editing them slightly (yy p in VIM):
deb [arch=amd64] http://archive.ubuntu.com/ubuntu/ jammy main restricted
deb [arch=amd64] http://archive.ubuntu.com/ubuntu/ jammy-updates main restricted
deb [arch=amd64] http://archive.ubuntu.com/ubuntu/ jammy universe
deb [arch=amd64] http://archive.ubuntu.com/ubuntu/ jammy-updates universe
deb [arch=amd64] http://archive.ubuntu.com/ubuntu/ jammy multiverse
deb [arch=amd64] http://archive.ubuntu.com/ubuntu/ jammy-updates multiverse
deb [arch=amd64] http://security.ubuntu.com/ubuntu jammy-security main restricted
deb [arch=amd64] http://security.ubuntu.com/ubuntu jammy-security universe
deb [arch=amd64] http://security.ubuntu.com/ubuntu jammy-security multiverse
And finally, refresh the package manager:
sudo dpkg --add-architecture amd64
sudo apt update
Determine File Type
For a quick test, just check which binaries are available via the package manager, e.g. for 7-zip. If you see both amd64 and arm64 builds listed, then sources.list is probably good:
apt list p7zip-fullNext, force install the 7-zip x86_64 executable and confirm it is an ELF 64-bit LSB pie executable, x86-64 file. Of course you should also test to make sure it works as expected, but that’s not shown here:
sudo apt install p7zip-full:amd64
file /usr/lib/p7zip/7z
7z b
Shared Directory
This is just the order I did things in: next up, mount shared macOS directories in the Linux VM, following the VirtioFS section at the bottom of the UTM Rosetta documentation:
sudo mkdir /media/share
sudo mount -t virtiofs share media/share
And like before, edit /etc/fstab as root, and add share /media/share virtiofs rw,nofail 0 0 to make it persist.
Docker Test
One last test: ensure Docker also uses Rosetta to run x86 executables. First, to pull a simple container and then run an interactive shell:
sudo docker run -it --entrypoint /bin/sh --rm --platform amd64 alpineDo a ps. If you see something like this, then, yay! It’s an x86 binary running through Rosetta in a Docker container! Magic!
PID   USER     TIME  COMMAND
    1 root      0:00 {sh} /media/rosetta/rosetta /bin/sh
   10 root      0:00 /bin/ps
If you don’t have Rosetta setup right, you might get an exec /bin/sh: exec format error trying to run the container.
However, if you have QEMU installed instead (i.e. via sudo apt install qemu qemu-user-static) then ps shows /usr/libexec/qemu-binfmt/x86_64-binfmt-P /bin/sh, /usr/bin/qemu-x86_64 /bin/sh, or something similar.
Bonus: If Docker is stuck pulling, and then times out with some sort of Error parsing HTTP response: invalid character '<' looking for beginning of value as a result of docker pull or docker run, then this is likely the problem. The solution is to set network MTU to 1400 or 900:
sudo apt install net-tools
sudo ifconfig enp0s1 mtu 1400