Today’s post will be a long one - recently, Docker announced some changes to the Docker Desktop license, so I figured I’d check out the Lima for macOS instead. As always, I end up complicating things by doing everything my way...
About Lima, QEMU, containerd
Let me explain all the components briefly, and point out their respective CLI:
- Lima “launches Linux virtual machines with automatic file sharing, port forwarding, and containerd” via
limactl, - QEMU is an “open source machine emulator and virtualizer” (for x86 Linux in this case) - containers are a Linux technology, but macOS is BSD, hence the need for QEMU to host a Linux virtual machine.
qemu-imgcreates a disk image andqemu-system-x86_64runs the VM. - containerd is “an industry-standard container runtime” that works in Linux via
nerdctl(containerd ctl).
These components are open source, without restrictions (mainly Apache 2.0 and GPL).
Installing Lima via Homebrew
Installing Lima is straightforward if you use Homebrew. Do this, then just jump to the Starting Lima section below:
xcode-select --install # if you haven’t done this before
brew install lima
I only run Homebrew in a High Sierra 10.13 VM, for fear of messing up my host system, which is on Catalina 10.15. If you have both host and guest VM on Big Sur 11, then brew just downloads all the latest compiled binaries. However, my setup with Catalina means Homebrew has to compile everything from scratch, since Big Sur APIs have changed...
So in my case, Homebrew downloads a truck of of dependencies and takes a long time to compile it all - go, m4, libtool, pkg-config, gdbm, mpdecim, pcre, glib, autoconf, automake, gmp, gnu-sed, libatomic_ops, bdw-gc, libunistring, jemalloc, libev, nghttp2, unbound, gnutls, jpeg, libpng, libslirp, libssh, libusb, lzo, ncurses, pixman, swig, llvm, snappy, vde and qemu, before getting to lima.
At time of writing, versions used are Lima v0.6.4, and QEMU v6.1.0.
For me, I encountered an error compiling QEMU, the x86 emulator that hosts the Linux VM that containerd relies on...
Fixing QEMU compile error
Compiling QEMU on my VM encounters this error, maybe because High Sierra 10.13 is no longer supported. You won’t get this error if you are using a Big Sur VM!
error: type arguments acocnt be applied to non-parameterized class 'NSObject'
@interface QemuCocoaPasteboardTypeOwner : NSObject<nspasteboardtypeowner>
                                                   ^~~~~~~~~~~~~~~~~~~~~
                                                   NSPasteboardType
/System/Library/Frameworks/AppKit.framework/Headers/NSPasteboard.h:22:20: note: 'NSPasteboardType' declared here
typedef NSString * NSPasteboardType NS_EXTENSIBLE_STRING_ENUM;
                   ^
../ui/cocoa.m:1766:43: error: type arguments acocnt be applied to non-parameterized class 'NSObject'
@interface QemuCocoaPasteboardTypeOwner : NSObject<nspasteboardtypeowner>
                                          ^       ~~~~~~~~~~~~~~~~~~~~~~~
2 errors generated.
Ok, so QEMU’s Cocoa UI does not work. Fortunately, lima and containerd do not need it.
If compiling manually, ./configure with --disable-cocoa will do the trick, but since this step is scripted via a Homebrew formula, instead do:
brew edit qemuAnd then edit the qemu.rb formula:
- add
--disable-cocoain theargsarray, which is the main thing needed - add
--target-list=x86_64-softmmuto compile only the x86 64-bit emulator, skipping all other processors - and, comment out the check for
OS.macwhich explicitly enables cocoa support.
args = %W[
    --prefix=#{prefix}
    --cc=#{ENV.cc}
    --host-cc=#{ENV.cc}
    --disable-bsd-user
    --disable-guest-agent
    --enable-curses
    --enable-libssh
    --enable-slirp=system
    --enable-vde
    --extra-cflags=-DNCURSES_WIDECHAR=1
    --disable-sdl
    --disable-gtk
    --target-list=x86_64-softmmu
    --disable-cocoa
]
...
# args << "--enable-cocoa" if OS.mac?
Now brew install lima should complete successfully. However, one cannot run lima from within a VM...
Transporting only what is needed
So what I want to do is:
- copy only the files needed to my main host OS, running Catalina, from my High Sierra VM (guest).
- change where the executable expects to find dynamically linked libraries (
.dylib) and other dependencies.
I’d rather not have executables and libraries in /usr/local/bin/ and /usr/local/lib or /usr/local/Cellar/.... Instead, I want executables to use a relative ./lib subfolder. These tools, which are part of the Xcode command line tools installed previously, are what we need:
otool -Lto “display the names and version numbers of the shared libraries that the object file uses”, andinstall_name_tool -change“changes dynamic shared library installed names”.
So, this script analyzes a given executable and copies only required libraries (and dependent libraries recursively) to a lib sub-folder, while changing the path to one relative to the executable, i.e.g @executable_path/lib.
#!/bin/bash
function fix_lib() {
 local file="$1"
 echo Scanning library "$file"
 local o=($(otool -L "$file"))
 if [[ $? -eq 0 ]]; then
  for lib in "${o[@]}"; do
   if [[ "$lib" == '/System/Library/'* || "$lib" == '/usr/lib/'* ]]; then
    echo - Ignoring $lib
   else
    if [[ "$lib" == '/'* && -f "$lib" ]]; then
     local new="${lib##*/}"
     echo - Fixing  $lib
     install_name_tool -change "$lib" @executable_path/lib/"$new" "$file"
     cp -n "$lib" "$new"
     if [[ $? -eq 0 ]]; then
      chmod +w "$new"
      install_name_tool -id "$new" "$new"
      fix_lib "$new"
     fi
    fi
  fi
  done
 fi
}

function fix_exe() {
 local file="$1"
 echo Scanning executable "$file"
 chmod +w "$file"
 local o=($(otool -L "$file"))
 if [[ $? -eq 0 ]]; then
  for lib in "${o[@]}"; do
   if [[ "$lib" == '/System/Library/'* || "$lib" == '/usr/lib/'* ]]; then
    echo - Ignoring $lib
   else
    if [[ "$lib" == '/'* && -f "$lib" ]]; then
     local new="${lib##*/}"
     echo - Fixing  $lib
     install_name_tool -change "$lib" @executable_path/lib/"$new" "$file"
     cp -n "$lib" lib/"$new"
     if [[ $? -eq 0 ]]; then
      cd lib
      chmod +w "$new"
      install_name_tool -id "$new" "$new"
      fix_lib "$new"
      cd ..
     fi
    fi
   fi
  done
 fi
}

mkdir lib
for f in "${@}"; do
 fix_exe "$f"
done
Don’t run any script you find on the Internet. Even if you know what every line does, be very careful! More so because I’m too lazy to explain every line. I made a tonne of errors coding this, screwing up libraries everywhere, so I disclaim any liability. I also do know the code parses otool sub-optimally and does not handle errors at all.
Step-by-step
Change the version folders to reflect the latest!
So to get the files needed, and only the files needed and nothing else:
- First, create a working folder, e.g. on the desktop
lima - There, copy the Lima and QEMU executables:
cp /usr/local/Cellar/lima/0.6.4/bin/limactl . cp /usr/local/Cellar/qemu/6.1.0_1/bin/qemu-img . cp /usr/local/Cellar/qemu/6.1.0_1/bin/qemu-system-x86_64 . - Next, run the script above on the QEMU executables (lima does not use non-system libraries). Also, remember to
chmod +x fix.shfirst. The script will create a folder calledlibwhich will eventually contain the “fixed” dynamic link libraries:./fix.sh qemu-img qemu-system-x86_64 - At this point,
limactlandqemu-system-x86_64will run but fail to find the BIOS, ROM and keyboard files. I only needed these for them to work:cp /usr/local/Cellar/lima/0.6.4/share/lima/lima-guestagent.Linux-x86_64 . cp /usr/local/Cellar/qemu/6.1.0_1/share/qemu/bios-256k.bin . cp /usr/local/Cellar/qemu/6.1.0_1/share/qemu/efi-virtio.rom . cp /usr/local/Cellar/qemu/6.1.0_1/share/qemu/vgabios-virtio.bin . cp /usr/local/Cellar/qemu/6.1.0_1/share/qemu/kvmvapic.rom . - Now you have all the files you need, about 44 MB in my case - feel free to copy from the VM to another mac or host.
It’s worth pointing out that at time of writing, Lima v0.6.4 is installed via Brew. There may be newer versions at Lima’s GitHub Releases. Since Lima provides pre-compiled macOS binaries, just download the latest, e.g. lima-0.7.1-Darwin-x86_64.tar.gz, and replace limactl and lima-guestagent.Linux-x86_64 from the folder share/lima.
To-recap, the only files needed are for my setup are:
- lima
- lima-guestagent.Linux-x86_64
- qemu-img
- qemu-system-x86_64
- bios-256k.bin
- efi-virtio.rom
- kvmvapic.bin
- vgabios-virtio.bin
- lib
- libcrypto.1.1.dylib
- libffi.7.dylib
- libgio-2.0.0.dylib
- libglib-2.0.0.dylib
- libgmodule-2.0.0.dylib
- libgmp.10.dylib
- libgnutls.30.dylib
- libgobject-2.0.0.dylib
- libhogweed.6.dylib
- libidn2.0.dylib
- libintl.8.dylib
- libjpeg.9.dylib
- liblzo2.2.dylib
- libncursesw.6.dylib
- libnettle.8.
- libp11-kit.0.dylib
- libpcre.1.dylibv
- libpixman-1.0.dylib
- libpng16.16.dylib
- libslirp.0.dylib
- libsnappy.1.dylib
- libssh.4.dylib
- libtasn1.6.dylib
- libunistring.2.dylib
- libusb-1.0.0.dylib
- libvdeplug.3.dylib
You may need something different for your versions of macOS!
Starting Lima
Now, assuming all needed files are copied to another mac or host in a folder, e.g. ~/lima, the first step is to make sure this folder is in the path so that limactl can find qemu-systemqemu-system-x86_64, e.g.:
PATH=$PATH:~/limaRunning limactl start for the first time will create the default Linux VM (called default):
? Creating an instance "default"  [Use arrows to move, type to filter]
  Proceed with the default configuration
> Open an editor to override the configuration
  Exit
Make sure to select Open an editor to override the configuration, which creates the configuration file ~/.lima/default/lima.yaml, and then allows you to edit it:
- most importantly, change
firmware.legacyBIOStotrue, - you can change the Linux distro to “an image must support systemd and cloud-init. Ubuntu and Fedora are known to work.” See lima/examples. For me:
- The Ubuntu download is 558 MB and takes 1.85 GB memory (in Activity Monitor) on startup,
- The Fedora download is 249 MB and takes 960 MB memory (in Activity Monitor) on startup...
- just change the
images.locationtohttps://download.fedoraproject.org/pub/fedora/linux/releases/34/Cloud/x86_64/images/Fedora-Cloud-Base-34-1.2.x86_64.qcow2
- you can configure
cpus(4 by default),memory(4 GiB),disk(100 GiB), etc. as you like, - and you may also change
mountsto mount your local folders to the VM below (not the containers running in the VM, mind).
arch: "x86_64"
images:
- location: "~/Downloads/hirsute-server-cloudimg-amd64.img"
arch: "x86_64"
- location: "https://cloud-images.ubuntu.com/hirsute/current/hirsute-server-cloudimg-amd64.img"
arch: "x86_64"
cpus: 4
memory: "4GiB"
disk: "100GiB"
mounts:
- location: "/tmp/lima"
writable: true
ssh:
localPort: 60022
loadDotSSHPubKeys: true
containerd:
system: false
user: true
firmware:
legacyBIOS: true
video:
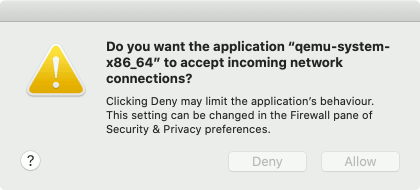
display: "none"After this, the VM will boot up, and after a while you will be prompted by macOS to accept incoming network connections - this is required to reach the container via SSH:
If all is good, you will see the console end with READY:
? Creating an instance default" Open an editor to override the configuration
INFO[0044] Downloading "https://github.com/containerd/nerdctl/releases/download/v0.11.2/nerdctl-full-0.11.2-linux-amd64.tar.gz" (sha256:27dbb238f9eb248ca68f11b412670db51db84905e3583834400305b2149915f2)
INFO[0044] Using cache "/Users/<user>/Library/Caches/lima/download/by-url-sha256/b4f5bbd91357ecaeb7f48edc2ba3a9ae42bfebf05436bdd5acbf4a8a8a4f33f0/data"
INFO[0045] Attempting to download the image from "~/Downloads/hirsute-server-cloudimg-amd64.img"
INFO[0045] Attempting to download the image from "https://cloud-images.ubuntu.com/hirsute/current/hirsute-server-cloudimg-amd64.img"
INFO[0046] Using cache "/Users/<user>/Library/Caches/lima/download/by-url-sha256/e1fed960ebd29619676c7ab7535bc83f7fb2ad71739edb6fde4e17bce0b61a47/data"
INFO[0046] [hostagent] Starting QEMU (hint: to watch the boot progress, see "/Users/<user>/.lima/default/serial.log")
INFO[0046] SSH Local Port: 60022
INFO[0046] [hostagent] Waiting for the essential requirement 1 of 4: "ssh"
INFO[0056] [hostagent] Waiting for the essential requirement 1 of 4: "ssh"
INFO[0071] [hostagent] Waiting for the essential requirement 1 of 4: "ssh"
INFO[0082] [hostagent] Waiting for the essential requirement 1 of 4: "ssh"
INFO[0083] [hostagent] The essential requirement 1 of 4 is satisfied
INFO[0083] [hostagent] Waiting for the essential requirement 2 of 4: "sshfs binary to be installed"
INFO[0104] [hostagent] The essential requirement 2 of 4 is satisfied
INFO[0104] [hostagent] Waiting for the essential requirement 3 of 4: "/etc/fuse.conf to contain \"user_allow_other\""
INFO[0122] [hostagent] The essential requirement 3 of 4 is satisfied
INFO[0122] [hostagent] Waiting for the essential requirement 4 of 4: "the guest agent to be running"
INFO[0122] [hostagent] The essential requirement 4 of 4 is satisfied
INFO[0122] [hostagent] Mounting "/tmp/lima"
INFO[0122] [hostagent] Waiting for the optional requirement 1 of 2: "systemd must be available"
INFO[0122] [hostagent] Forwarding "/run/user/501/lima-guestagent.sock" (guest) to "/Users/<user>/.lima/default/ga.sock" (host)
INFO[0122] [hostagent] The optional requirement 1 of 2 is satisfied
INFO[0122] [hostagent] Waiting for the optional requirement 2 of 2: "containerd binaries to be installed"
INFO[0122] [hostagent] Not forwarding TCP 127.0.0.53:53
INFO[0122] [hostagent] Not forwarding TCP 0.0.0.0:22
INFO[0122] [hostagent] Not forwarding TCP [::]:22
INFO[0125] [hostagent] The optional requirement 2 of 2 is satisfied
INFO[0125] READY. Run `limactl shell default` to open the shell.
Now you can connect to the Linux VM, and check what version of Linux is running:
limactl shell default
uname -a
To-reap:
./limactl start defaultto start the VM./limactl stop defaultto stop the VM
Starting a Container
This command will download and run the Docker hello-world image image to make sure everything works. You’ll note the same parameters you’d use with Docker:
limactl shell default nerdctl run -it --rm hello-worldIf you see “Hello from Docker! This message shows that your installation appears to be working correctly”, then congratulations, you have a working Docker replacement. Maybe partially, I don’t know as I have never tested everything...
You can also try limactl shell default nerdctl run -it --rm -p 8080:80 nginx to run nginx. Check http://localhost:8080 for the “Welcome to nginx!” message.
Building and Naming Images or Containers
For me at the time of writing:
- I can create new images with Ubuntu (
docker build), but not with Fedora - some sort of folder permission error. nerdctlis very sensitive to the position of parametersnerdctrl build . -name tagis ok butnerdctrl build -name tag .is not (or is the other way around?)- This also applies when starting / running containers - list your images with
docker ps -aand you will see missing tag names.
Replacing docker CLI
I have another script to simplify using lima and the underlying nerdctl for containerd, a bit more like the original docker CLI. I’m not using the default lima script, instead, I use my own called ndocker.sh:
#!/bin/sh
home="$(cd "$(dirname "${BASH_SOURCE[0]}")" >/dev/null 2>&1 && pwd)"
instance=${LIMA_INSTANCE:-default}
case "$1" in
begin)
 cd $home
 PATH=$PATH:"$home" ./limactl start ${2:-$instance}
 cd - >/dev/null ;;
end) $home/limactl stop $${2:-$instance} ;;
shell) $home/limactl shell ${2:-$instance} ;;
ls|list) $home/limactl ls ;;
*) $home/limactl shell $instance nerdctl "$@"
esac
So:
./ndocker.sh beginto start the Linux VM in QEMU, or./ndocker.sh begin fedorato start the named VM, orLIMA_INSTANCE=fedora ./ndocker.sh beginto start the named VM./ndocker.sh endto stop the Linux VM in QEMU- To run any other command similar to the docker CLI, e.g.
./ndocker.sh helpfor help./ndocker.sh psto list containers./ndocker.sh run -it --rm hello-worldto test with hello world./ndocker.sh run -it --rm -p 8080:80 nginxto test with nginx
What’s next?
Maybe one day, Lima can be packaged as a macOS .app...
Good luck!
Updated 16 Oct 2021: Added a section to explain my weird setup using High Sierra and Catalina, as you will not have problems if using Big Sur. Corrected a missing line in the fix script, which meant that the executables were not fixed! Lima is now 0.71 when installed via Homebrew.
Updated 31 Dec 2021: added chapter on building or naming...