I recently wanted to upgrade my Raspberry Pi, and I setted on an Orange Pi Zero 3 Single Board Computer (SBC). Here is how I set it up.
Orange Pi
I didn’t want to spend much as I have very basic requirements for my device. Both the Orange Pi Zero 3 and the Raspberry Pi Zero 2W cost about $15. But I settled on the Orange Pi, because it:
- has on-board gigabit Ethernet, which is my personal connectivity preference
- has both Wi-Fi 5 and Bluetooth 5, vs only Wi-Fi 4 and BT 4.2 on the Raspberry Pi Zero
- has a similar quad-core 64-bit ARM Cortex-A5, though the Allwinner H618 is clocked slightfly faster at 1.5GHz, vs 1 GHz,
- and comes with a minimum of 1 GB LPDDR4 RAM compared to 512 MB LPDDR2, and goes up to 4 GB RAM!
- plus it is supported by DietPi OS, so I don’t have to use an unreliable Linux distribution.
I got the 1 GB version with a aluminium heatsink that looks like this. Even with the heatsink it runs warm to the touch.

DietPi OS
DietPi a lightweight, Debian-based Linux distro highly optimized for Raspberry Pis, Orange Pis and many other SCBs. At the time of writing, DietPi is at version 9.14, released June 2025.
Much danger ahead! Don’t follow what I do unless you fully understand every command. This blog is just for me to remember my steps!
Installation
First things first, download the applicable disk image from the DietPi home page.
Next, copy the disk image to a micro SD card. I initially used a 2GB card but quickly found it was out of space. At least 1.5 GB is used by the OS.
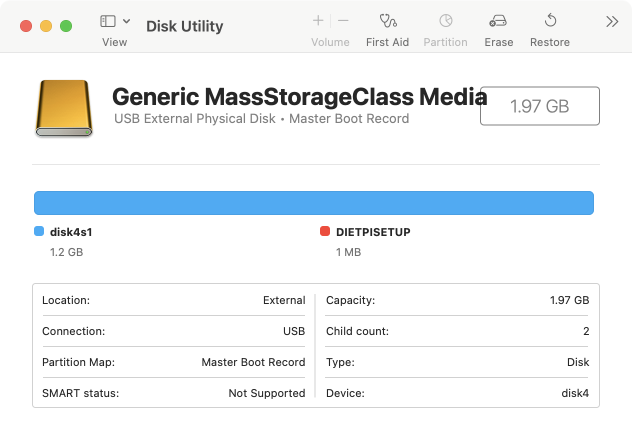
I am on macOS, so I am using either the internal SD card reader with an adapter or external microSD card reader. Upon connection, macOS will mount the SD card if it has a known format like NTFS or exFAT. In this case, then get the disk and partition name e.g. /dev/disk4s1 and unmount the drive first:
df -hto list mount points,sudo diskutil unmount /dev/disk4s1
You can also view the disk via the Disk Utility.app and eject it.
In my example above, the disk is /dev/disk4 - without the partition number s. To write the downloaded disk image I use dd without needing to download any other software. You can read more at RPi Easy SD Card Setup: Using command line tools:
sudo dd bs=4M status=progress if=DietPi_OrangePiZero3-ARMv8-Bookworm.img of=/dev/rdisk4Enter your administrator password, and then wait - the system will show the number of MB written and speed. This specific image file, which is 120,9008,128 bytes, ended with this message for me:
288+1 records in
288+1 records out
1209008128 bytes transferred in 35.318163 secs (34231909 bytes/sec)
Configure Unattended Install
Now you will see a new FAT12 partition mounted, called DIETPISETUP, and this should be automatically mounted by macOS.
The drive contains the DietPi setup files, but since I am not using wifi, I can ignore dietpi-wifi.txt, and only edit dietpi.txt for unattended, head-less (without a monitor) installation.
Read the documentation first:
- How to do an automatic base installation at first boot (DietPi-Automation) -List of tz database time zones
- DietPi software options and DietPi Software IDs list
I configured by network to allow a static IP address for my boards MAC address. Your network will likely differ, so change as needed. The upstream DNS’s I configured are Cloudfare and Quad9, but this will change in my next post...
Also I auto install only DietPi-Dashboard, the “official lightweight standalone DietPi web interface” ID = 200. Even if you don’t install software now, you can always run dietpi-software to install software later.
AUTO_SETUP_GLOBAL_PASSWORD=dietpi
AUTO_SETUP_LOCALE=C.UTF-8
AUTO_SETUP_KEYBOARD_LAYOUT=us
AUTO_SETUP_TIMEZONE=UTC
AUTO_SETUP_NET_ETHERNET_ENABLED=1
AUTO_SETUP_NET_WIFI_ENABLED=0
AUTO_SETUP_NET_WIFI_COUNTRY_CODE=GB
AUTO_SETUP_NET_STATIC_IP=192.168.0.100
AUTO_SETUP_NET_STATIC_MASK=255.255.255.0
AUTO_SETUP_NET_STATIC_GATEWAY=192.168.0.1
AUTO_SETUP_NET_STATIC_DNS=1.1.1.3 9.9.9.9
AUTO_SETUP_NET_HOSTNAME=DietPi
AUTO_SETUP_WEB_SERVER_INDEX=-2
AUTO_SETUP_DESKTOP_INDEX=0
AUTO_SETUP_BROWSER_INDEX=0
AUTO_SETUP_AUTOSTART_TARGET_INDEX=0
AUTO_SETUP_AUTOMATED=1
AUTO_SETUP_INSTALL_SOFTWARE_ID=200
SURVEY_OPTED_IN=0
CONFIG_CHECK_DIETPI_UPDATES=1
CONFIG_SERIAL_CONSOLE_ENABLE=0
Do not put your value in double quotes, though the comments seems to suggest that, e.g. for the time zone, keyboard layout, etc.
Install!
Eject (unmount) the SD card from your computer... and plug it into the Orange Pi. Power up the board and wait... I am running headless, so I won’t know the status of the install until I can reach via ping and ssh.
Once you can ping, login as either dietpi or root user, using the password you configured above.
ssh root@192.168.0.100Since the OS installation will take time, you are likely to see a message that:
DietPi first run setup is currently running on another screen.
Automated setup is in progress. The system might be rebooted in between.
This didn’t last that long for me and finally you will be greeted with the prompt! Run dietpi-launcher to see all available DietPi tools, chiefly:
dietpi-config, e.g. you might want to change1: Display Options>14 Led Controls>- 1: green =
disk-readand - 2: red =
disk-write
- 1: green =
dietpi-softwareto software install. I install e.g.- DietPi Dashboard,
- AdGuard Home,
- Naivdrome,
- Lighttpd,
- Homer,
- File Browser,
- etc.
Posts to follow.
More RAM disk
Once all my installation is done... I want to tweak settings so as to minimize or totally avoid writes to the SD card to reduce wear. Where required I will prefer to log to the DietPi-RAMlog /var/log directory (tmpfs), which is by default, limited 50 MB.
Since I don’t expect to install much via APT, 4: Advanced options
- APT Cache = Disabled
- APT Lists = change from
On DiskToIn RAM - APT Archives =
On DisktoTo RAM
I also disable the entire swapfile! Use the dietpi-drive_manager tool and, if you need to, read the System Configuration documentation.
Then I move the .bash_history file to RAM disk, by editing .bashrc and adding the line below. I also move or delete the existing /root/.bash_history file if it already exists.
export HISTFILE=/var/log/.bash_historyWhile here I also add these to my .bashrc e.g.:
alias ls='ls -al --colors=auto'
alias grep='grep --color=auto'
alias vi=nano
alias ..='cd ..'
Do the same for both the root and dietpi users, if you need to. I am lazy so I just 'ln -s /root/.bashrc /home/dietpi/.bashrc` so that the dietpi user uses the file as the root user... Bad practice.
Less / No Logs
For DietPi-Dashboard, I won’t bother with logs (assuming everything works), so edit /opt/dietpi-dashboard/config.toml:
log_level = "off"The default editor is nano, so I also disable nano’s search history file and locking files. Edit /etc/nanorc and comment the relevant options (first 2 lines in the sample below). While there I enabled other options:
# set historylog
# set locking
set constantshow
set indicator
set minibar
set mouse
set tabsize 4
I also enable the more “usual” keybindings like Ctrl+S for Save, Ctrl+Q for Quit, etc. which are located at the very end of the file.
Resize Partition?
Here is the annoying part about DietPi - it automatically fills the entire SD card. But with a 64GB SD card, I wanted a smaller 4 GB OS partition and a large 60GB data partition. Most methods require you to be able to boot to another instance of Linux in order to resize the partition.
I am too lazy to do that, but I have an old 2GB SD card to install DietPi on. Then back on my mac, I copied the content of the 2 GB SD card to an image file, and then copied the image to the larger 64 GB SD card
# insert / mount SD card #1
sudo dd bs=4M status=progress if=/dev/rdisk4 of=mysd.img
# eject / unmount SD card #1
# insert / mount SD card #2
sudo dd bs=4M status=progress if=mysd.img of=/dev/rdisk4
Danger! Do not run command that you do not understand fully!
Now boot using the new SD card. Run df -h to determine the partition information. I created a new partition with fdisk or parted. Then I moved the entire /mnt/dietpi_userdata to this partition and created symbolic link from the mount to the drive.
Conclusion
That’s how I setup DietPi on my Orange Pi Zero 3. I intend to use it as a DNS sinkhole, and as a music streaming server. More on that next...