Here is a macOS Automator script to watermark a PDF, and also set metadata like author and title. Followed by a more advanced script to do all that an also set an owner password and access permissions... auto-magically.
You will need:
- an original PDF file - it must not have any password applied!
- a PNG watermark image with a transparent background (RGBA)
- an Automator.app script of
Workflowtype
Simple Automator Workflow
The simple version of my Automator workflow uses only standard in-built actions:
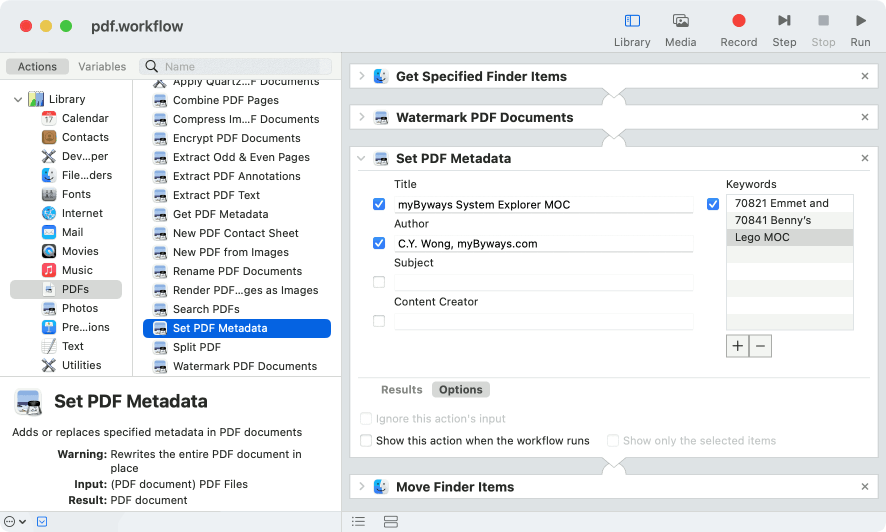
Get Specified Finder Items- click Add... and select the original PDF file,Watermark PDF Documents- click Add... and select the watermark PDF:- Select Draw watermark over PDF,
- Adjust the X and Y position, scale, angle and opacity of the watermark - this requires a lot of trial and error, as the preview image is not that of the original PDF.
- Note that this action actually creates a copy of the PDF in a temporary folder.
Set PDF Metadata- set PDF metadata including title, author, subject, content creator and keywords, self-explanatory,- Note that this action edits the current PDF in-place, hence this is my preferred order, so that the original PDF file is not touched
Move Finder Items- and choose a location, e.g.Desktop
Save! Then, test:
- run the workflow (Command+R),
- and on the Desktop, you should now see a new PDF file, prefixed with
(With Watermark) n. - Check the PDF by opening it in Preview:
- check that all pages have the desired watermark,
- from the Tools menu > Show Inspector (Command+I), check that the metadata is correctly written
Notes:
- You will be prompted to allow Automator accessibility System Preferences > Security & Privacy > Accessibility > check Automator.app - restart Automator if you need to
- You will also be prompted to allow folder access:

You can of course convert this from a Workflow type, to:
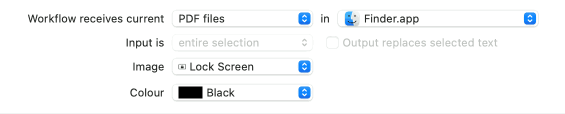
- a Quick Action - so that you can right-click a PDF file and run this workflow from the Quick Actions menu:
- set this input:
- delete the
Get Specified Finder Itemsaction
- set this input:
- or, a Folder Action - so that any PDF dropped into a given folder is automatically password protected and watermarked.
I didn’t, since I expect to rarely use this... except for the special occasion involving my last post, My System Explorer MOC 70821 + 70841.
Advanced Automator Workflow
Automator has no in-built PDF action to set a password to open, nor set the owner password, nor set access permissions (to allow or deny printing; copying text or graphics; inserting, deleting or rotating pages; adding annotations or signatures; or filling existing form fields).
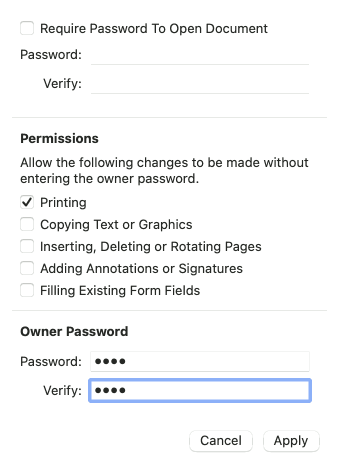
In my use case, I only wanted to set the owner password and to allow Printing - specifically:
However, Automator can automate the process by which Preview can do these things! All it involves is an AppleScript to send keystrokes and click buttons / checkboxes.
The workflow is similar, with the addition of step #4:
Get Specified Finder Items- as aboveWatermark PDF Documents- as aboveSet PDF Metadata- as aboveRun AppleScript- paste the script below, changing the password in the first line - the script is adapted (“simplified”) from the ”AppleScript to add password to PDF in Preview” answer provided by applescript unsung hero and fanaticuser3439894(those are really his badges)Move Finder Items- as above
This script:
- runs Preview and opens the
inputPDF file provided by the previous action, - clicks on the File menu > Export...,
- waits for an then clicks the Permissions... button in the export dialog,
- waits for the ”Require Password To Open Document“ checkbox in the next dialog (previous screenshot),
- sends the owner password (the cursor is already placed in the correct input field), hits Tab and then sends it again to the second input field,
- and clicks on the “Printing“ checkbox followed by the Apply button to close this dialog,
- click Save, and then click Replace when asked to confirm overwriting the file,
- and finally, return the
inputas the result to the next action.
property ownerPassword : "1234"

on run {input, parameters}
    tell application "Preview"
        open input
        activate
    end tell

    tell application "System Events"
        tell application process "Preview"

            tell its menu "File" of ¬
                menu bar item "File" of menu bar 1 to ¬
                click (its first menu item whose name is "Export…")

            repeat until exists button "Permissions…" of sheet 1 of window 1
                delay 0.1
            end repeat

            tell its sheet 1 of window 1 to click button "Permissions…"

            repeat until exists ¬
                checkbox "Require Password To Open Document" of ¬
                sheet 1 of sheet 1 of window 1
                delay 0.1
            end repeat

            tell its sheet 1 of sheet 1 of window 1
                keystroke ownerPassword
                key code 48
                keystroke ownerPassword
                click checkbox "Printing"
                delay 0.1
                click button "Apply"
            end tell

            delay 0.1
            click button "Save" of sheet 1 of window 1

            delay 0.1
            if exists button "Replace" of sheet 1 of sheet 1 of window 1 then ¬
                click button "Replace" of sheet 1 of sheet 1 of window 1

            click button 1 of window 1

        end tell
    end tell
    return input
end run
As usual, don’t run anything you see on the Internet blindly. Plus take note of a very big caveat - absolutely no error handing is implemented!
Built-in Robotic Process Automation!