If the preceding posts on Node.js and MongoDB have been too complex for you, let me introduce you to a simpler drag-and-drop “flow-editor,” Node-RED.. It was developed and open-sourced by IBM, and is now hosted by the OpenJS Foundation (the same foundation that hosts projects like jQuery, and Dojo). I’ve used Node-RED for quick prototypes and demos, as it’s easy to explain each step of the flow. It saves a lot of coding effort and reduces errors buy providing built-in and pre-built third-party “nodes”.
Starting Node-RED
As usual, we will create a working folder, and from that folder, start up the Node-RED container, obtained from Docker Hub.
docker run --name mynodered -it -p 1880:1880 -v $PWD:/data nodered/node-red-docker
BTW, one could skip mounting the local folder -v altogether, as Node-RED provides a way of importing and exporting flows created via the clipboard. But if you do, then any installed nodes and deployed flows will be saved in your folder. The Node-RED web-based User Interface is exposed on port 1880.
When it’s up and running, you’ll see [info] Server now running at http://127.0.0.1:1880/, so go ahead and open your browser to that URL.
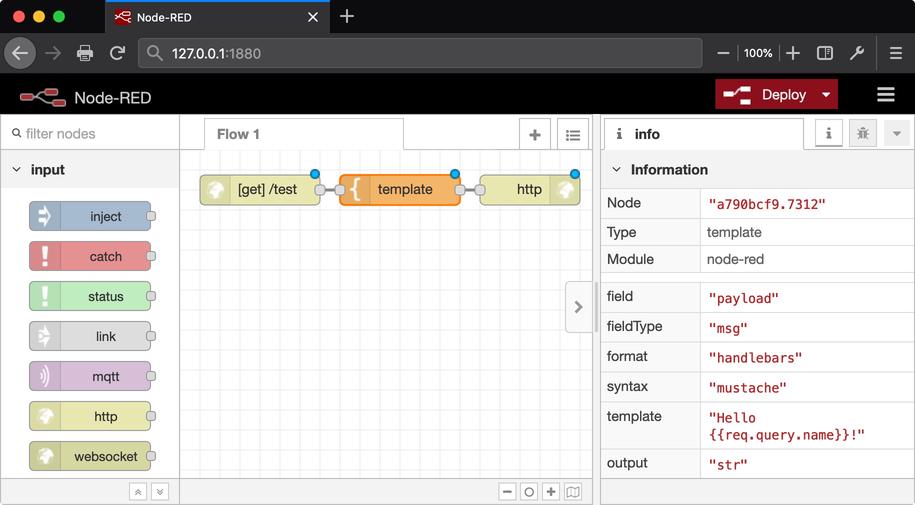
You can create a flow to quickly test Node-RED. From the palette on the left, drag the following nodes to the canvas, and connected them up as shown:
- input > http node - leave the Method as
GETand set the URL (route) to/test. - function > template node - leave the Property as
msg.payloadand Format asmustache template(more on that later), and set the Template toQuery string = {{req.query.name}}. Leave the Output aPlain Text. - output > http response node - just leave everything as-is.
Hit the red Deploy button, and you’ll get a Successfully deployed toast notification. Now, open another browser tab to http://localhost:1880/test?name=james+bond, and you’ll see the ouput Hello james bond!
Visit the Node-RED Cookbook for more samples.
Finally,
- To stop the container that is interactive, just hit Ctrl-C
- To re-start the container, type
docker run mynodered - To list all containers (running or stopped) in case you forget their names,
docker ps -all - To delete the (stopped) container,
docker rm mynodered - To delete the downloaded image,
docker rmi nodered/node-red-docker
Adding Capabilities via Nodes
There’s lots more you can do without writing any code! From the menu, go to Manage Palette > Install. For example, one could install:
node-red-node-watson- to get access to IBM Watson Assistant to build a chat bot.node-red-contrib-chatbot- to allow Slack, Telegram, etc. to be the front-end to the Watson chat bot.
💡 Tip
Note: many nodes are created by third parties, user beware.
Anyway, with just a few nodes, you’ll have a running chatbot! You can log the inputs or outputs of each node by attaching the green debug nodes, e.g.
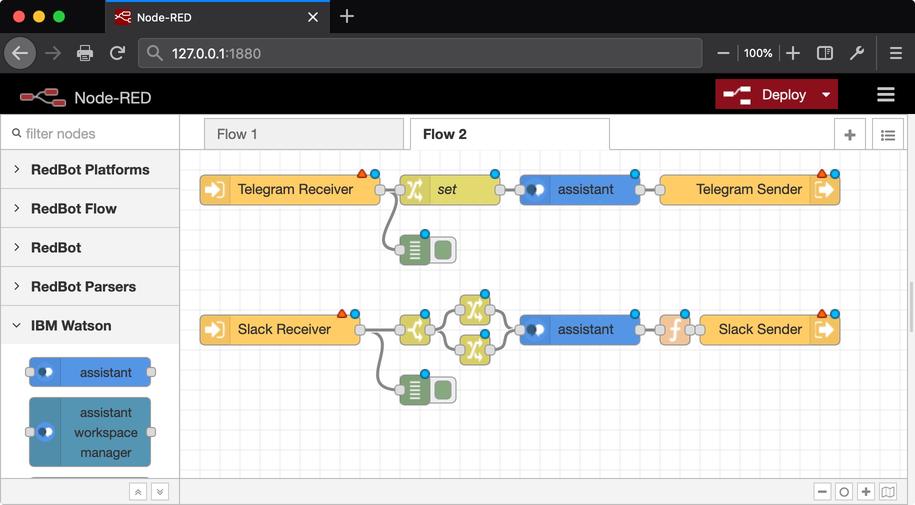
I won’t go into details here though, since Aiman has a tutorial, titled How to create a Watson Chatbot on Node-RED, which integrates IBM Watson Assistant and Language Translator with Telegram and Spotify… without coding!
JSON handing in Node-RED
Actually, I lie. The aforementioned tutorial does use some JavaScript code, but there are other in-built ways to avoid coding in Node-RED altogether.
First, know that Node-RED passes data between nodes in JSON (JavaScript Object Notation) format - simply, it’s a collection of name-value pairs and/or ordered lists (i.e. arrays). See the W3Schools JSON - Introduction.
- Name-value pairs:
{ "key": "value" } - Arrays:
["a", "b"] - All nested together:
{
	"name": {
		"first": "James",
		"last": "Bond"
	},
	"code": "007",
	"age": 30,
	"cars": [
		{
			"make": "Lotus",
			"model": "Esprit"
		},
        {
			"make": "Aston Martin",
			"model": "DB5"
		},
        {
			"make": "BMW",
			"model": "Z8"
		}
	]
}
Next, manipulating JSON data is done using the change node. Apart from statically assigning values, you can perform simple transforms on the JSON data using JSONata (another open-sourced IBM innovation). Try out the JSONata Exerciser:
- Math operators e.g.
age++= 31 - String manipulation and functions e.g
name.first & name.lastgivesJamesBondand$join([ "a", "b", "c" ])to produce"abc" - Array manipulation e.g.
cars[2].makereturnsBMWand$append([1,2,3], [4,5,6])creates an array with[1,2,3,4,5,6] - Functions e.g.
$count(cars)is 3, but there are many functions like$now(),$max(…),$sum(…),$random(), etc. - Sorting e.g.
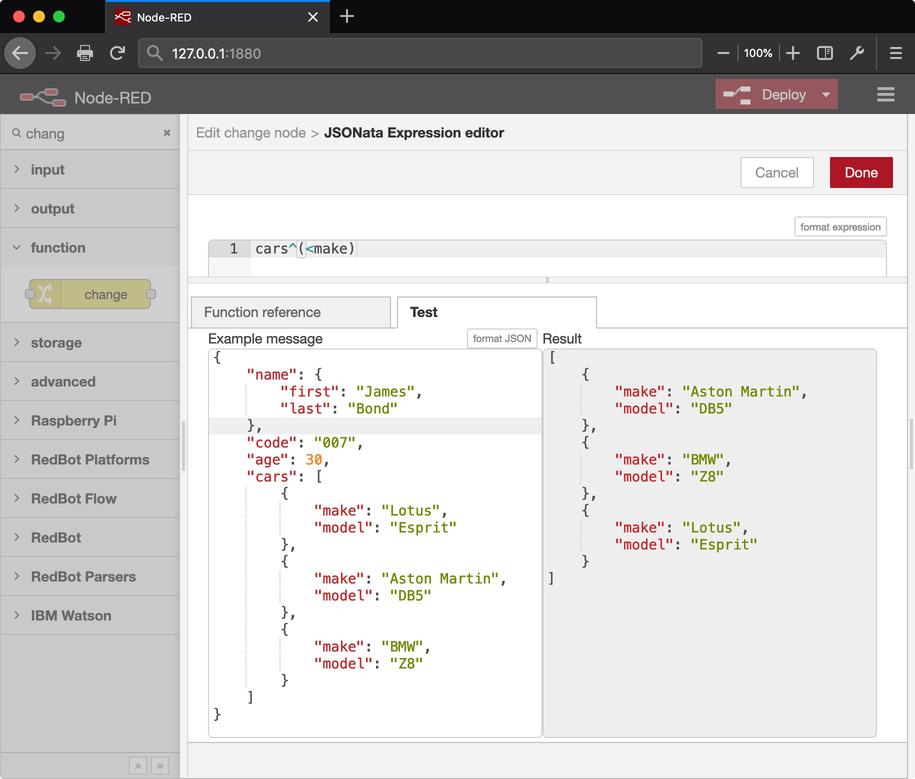
cars^(<make)sorts a list in ascending order (i.e. Aston Martin first), or inversely,cars^(>make). - Regular expressions to search or filter data e.g.
cars[make ~> /(Lotus|BMW)/].modelto return only the Lotus and BMW models.
From the Node-RED change node, select the option expression (the icon looks like J:) and press … to build and test expressions, e.g.
Finally, converting JSON data into text or HTML output is done using the template node, which uses Mustache templates as mentioned above. Mustache is a template-system that replaces placeholders (within {{ and }} tags) with JSON data. You can try the playground at the Mustache home page.
- Mustache
Agent {{code}} is {{name.last}}, <b>{{name.first}}</b> {{name.last}}. - JSON
{ "name": { "first": "James", "last": "Bond" }, "code": "007" } - Output in HTML is “Agent 007 is Bond, James Bond.”
Conclusion
No code, simple “install” prototyping. Have fun!