Just sharing some Automator scripts I use for Touch Bar Quick Actions showcasing three different methods - using pre-defined Actions, using AppleScripts and using Shell scripts.
First, head over to System Preferences... > Keyboard > Customize Touch Bar... and drag the Quick Actions icon onto your task bar like so:
![]()
Next, open up Automator.app and create a New Document. Here are a few different types of scripts I use.
Action: Toggle Dark Mode
From the Actions pane, under Library > Utilities > Change System Appearance and double click it:
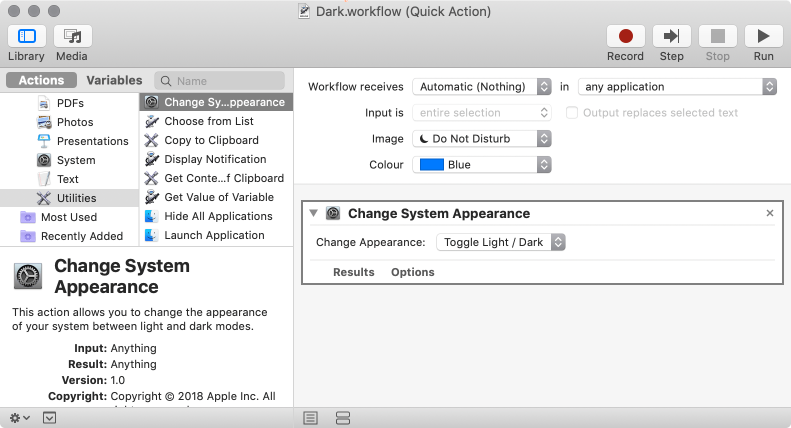
I select Toggle Light / Dark and saved this Quick Action as Dark.workflow.
Note that Workflow receives must be no input. If you select something else like text you’ll find the Quick Action greyed out in the Touch Bar.
There are other ways to Toggle Dark Mode as I previously described!
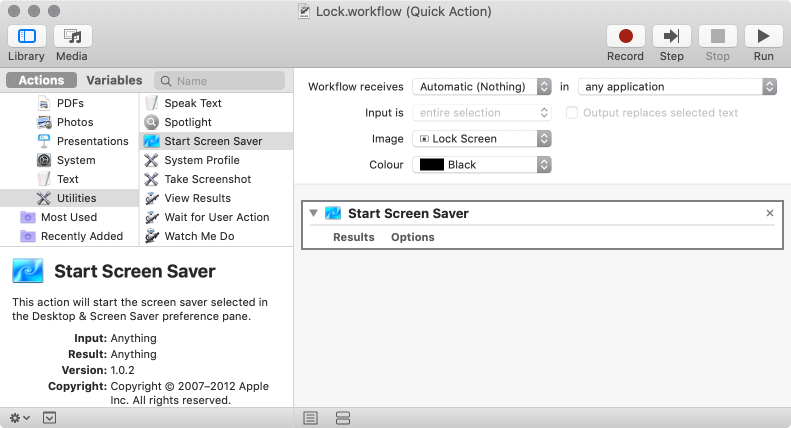
AppleScript: Lock Screen keystroke
With Automator, you can trigger the configured screensaver (this works even if no screen saver is scheduled): From the Actions pane, under Library > Utilities > Start Screen Saver and double click to add it:
Or put the computer to sleep: From the Actions pane, under Library > Utilities > Run AppleScript. Double click it and enter the script:
tell application "Finder" to sleepHowever, both methods don’t lock the computer unless Require password... after sleep or screen saver begins is checked under System Preferences > Security & Privacy > General.
The alternative is to send a system wide Control-Command-Q keystroke which works from High Sierra onward:
tell application "System Events" to keystroke "q" using {control down, command down}I saved this as Lock.workflow.
There is a built-in Screen Lock Quick Action, but if you want to enhance it to do something else when you lock your computer, then use one of the methods above. But here, I don’t describe what the “something else” can be...
You may get a message to allow Automator to control your computer. You need to allow this or you will get an error running the script. To change this, go to System Preferences > Security & Privacy > Privacy. Click the lock to make changes and then under Accessibility, check Automator.
To find the built-in operations, open up Script Editor.app, and under Window > Library. For example, double click on Finder to get documentation of what else Finder can do. In the example above, under Legacy suite, you can not only sleep but also shut down and restart.
AppleScript to Navigate an App Menu: New Terminal Window with Profile
This example navigates an application’s menus. Here I want the Terminal.app to open a new window with a specific profile, which I have configured to use zsh instead of bash. The Terminal menu hierarchy for my profile - which I called Z Monokai - is 3-levels deep:
- Shell
- New Window
- Z Monokai
- New Window
From the Actions pane, under Library > Utilities > Run AppleScript. Double click it and add the code:
tell application "Terminal"
    activate
    tell application "System Events"
        click menu item "Z Monokai" in menu "New Window" of menu item "New Window" in menu "Shell" of menu bar item "Shell" in menu bar 1 of process "Terminal"
    end tell
end tell
The click menu item is the key, and you’ll note that the script seems to be specified backwards through the menu hierarchy.
I saved this as zsh.workflow:

I specifically do this because my Terminal by default uses bash but sometimes I want to quickly trigger zsh instead, so my profile changes the Startup Run Command to /bin/zsh:

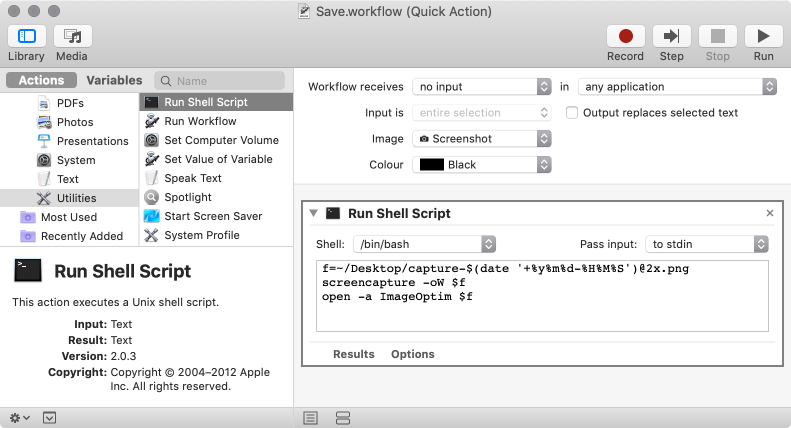
Run a Shell Script: Take a Screen Shot and Compress it
Here I use a shell script to save a screen shot to a file using the screencapture command, and compress it:
- First, specify the screenshot file name, formatted as
capture-yyyymmdd-hhmmssand which will be saved on the Desktop, - Then, take an interactive screen shot of a window and save it to the file specified above,
- And, then use ImageOptim (interactively) to losslessly compress the PNG further.
From the Actions pane, under Library > Utilities > Run Shell Script. Double click it and add the script:
f=~/Desktop/capture-$(date '+%y%m%d-%H%M%S')@2x.png
screencapture -oWx $f
open -a ImageOptim $f
(Actually I have a more complicated shell script, described in 2015, Screen capture script for retina display with PNG optimization).
I save this as Save.workflow with an appropriate icon:
You can also run a shell script from AppleScript, e.g. do shell script "f=~/Desktop/capture-$(date '+%y%m%d-%H%M%S')@2x.png && screencapture -oW $f && open -a ImageOptim $f"
You might ask why not use the in-built Take Screenshot Action, selecting Choose Window and Save To Clipboard?
I don’t use this because it displays an Automator dialog “Please select a window to take a scree shot” that waits for a click on the OK button, and also captures windows with a shadow! Instead, the screencapture command achieves exactly what I want - no dialog and no shadow:
screencapture -coWTo explain the arguments:
-cforce screen capture to go to the clipboard-oin window capture mode, do not capture the shadow of the window-Wstart interaction in window selection mode (which allows me to hit Space to capture a selection instead).
This is what my Clip.workflow uses.
Well, hope these examples helped someone!
BTW there is a follow up post with a Quick Action “running” a macrio-enabled Word document (.docm) - a method to use Microsoft Word to “convert” a TIFF or Microsoft Office Drawing object or TIFF on the clipboard to a PNG image, suitable for pasting as an image.
Updated 13 Oct: Bit of clarification on why I don’t use the built-in screen shot and lock Quick Actions. Added the “next post” paragraph above.