From macOS Catalina 10.5 onwards, zsh is the default shell, instead of bash. I have a lot to learn about this shell, and so far, this is how I configured zsh... There is an overload of snippets on-line, but I’ve not seen a post doing what I do, so hopefully this helps someone!
I, of course, need to configure zsh my way! I’m not using any settings framework like Oh My Zsh or third party plugins, which may cause performance issues. If you are like me, you may be interested in this comprehensive 8-part guide on Moving to zsh.
With Catalina, Terminal.app may prompt you to update to zsh:
The default interactive shell is now zsh.
To update your account to use zsh, please run `chsh -s /bin/zsh`.
For more details, please visit https://support.apple.com/kb/HT208050.
You can follow these instructions before proceeding, but for now, it’s ok to just run zsh manually too.
bash is still available for your scripts - just make sure your scripts start with the hash-bang #!/bin/bash.
Here is my .zshrc configuration file - presented in pieces, so it’s easier to explain:
Options
setopt nobeep autocdThere are many zsh options you can control. Here are two:
nobeepto turn off all beeps (this is the same asunsetopt beep). To turn off only the auto-complete error beep, usenolistbeep(orunsetopt listbeep).autocdenables you to just enter a directory name withoutcdto change directory! Also works with..so now I can drop myalias ..='cd ..'
With autocd alone you can use cd - to return to the previous directory. Even cooler, I alias this to -!
But if you want a full directory history, then then add an additional option setopt autopushd. Now:
- To list the directory stack, run
dirs -v - Use
~n(wherenis a number) to go to the directory as numbered indirs -v. - But
cd +nwill move down the list 2+1 steps, starting from 0. - While
cd -nwill move up the list 2+1 steps from the bottom.
I don’t use autopushd, since even without it, cd - will still return you the previous directory. But dirs will always only contain a single previous directory.
Another one that might be useful is setopt correct_all to auto-correct inputs, e.g. entering grp will prompt you zsh: correct 'grp' to 'grep' [nyae]?
setopt lists the active options, and unsetopt list inactive options.
Colors
export TERM="xterm-256color" CLICOLOR=1
export LESS_TERMCAP_mb=$(print -P "%F{cyan}") \
    LESS_TERMCAP_md=$(print -P "%B%F{red}") \
    LESS_TERMCAP_me=$(print -P "%f%b") \
    LESS_TERMCAP_so=$(print -P "%K{magenta}") \
    LESS_TERMCAP_se=$(print -P "%K{black}") \
    LESS_TERMCAP_us=$(print -P "%U%F{green}") \
    LESS_TERMCAP_ue=$(print -P "%f%u")
Set colors:
- The first line tells the shell to support more colors, with
CLICOLOR=1specifically to colorizels. - And the next will colorize
manpages (help) - other people use the old ASCII escape codes like below, but for me the new codes work equally well:%F- set foreground color, followed by a color like magenta, red, yellow, green, cyan, blue, black and white, or a color code (240 is gray)%f- reset foreground to default,%K- set background, followed by a color too,%k%- reset background to default,%Band%b- bold and remove bold.
export LESS_TERMCAP_mb=$(printf "\e[1;31m")    # blink
export LESS_TERMCAP_md=$(printf "\e[1;31m")    # bold
export LESS_TERMCAP_me=$(printf "\e[0m")       # end bold, blink and underline
export LESS_TERMCAP_so=$(printf "\e[1;44;33m") # standout (reverse video)
export LESS_TERMCAP_se=$(printf "\e[0m")       # end standout
export LESS_TERMCAP_us=$(printf "\e[1;32m")    # underline
export LESS_TERMCAP_ue=$(printf "\e[0m")       # end underline
Prompts
PROMPT="%F{cyan}%U%~%u%f$ %F{green}%B"
preexec () { print -Pn "%b%f" }
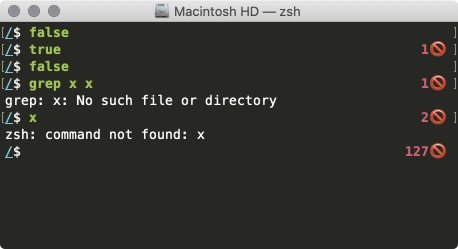
RPROMPT="%(?..%F{red}%?🚫%f)"
printf "\033]0;`date "+%a %d %b %Y %I:%M %p"`\007"Using prompt expansion and color codes above:
- Left prompt - the current path, use
%1~instead of%~to just show the current folder and not the full path. I also set the input text to bold green like a TTY console. - However, to reset text after the input line, the solution is to reset the colors in the
preexec()function that gets called before the command executes. - Right prompt - the exit / return code from the last command only if there is an error (i.e. non-zero) - the magic is the conditional syntax
%(?.<true>.<false>), which may be useful if you do a lot of scripting. - Unrelated, I also set the title of the Terminal window.
Auto-Completion
autoload -Uz compinit
fpath+=~/.zshfn
compinit
zstyle ':completion:ls:*' menu yes select
zstyle ':completion:*:default' list-colors \
    "di=34:ln=35:so=32:pi=33:ex=31:bd=34;46:cd=34;43:su=30;41:sg=30;46:tw=30;42:ow=30;43"
This part is a little crazy and I’m not going to explain much - go read up. In short:
- Load the auto-completion plugin that auto-completes command line arguments.
- Set the
fpathwhere I store my zsh functions and auto-completion files in~/.zshfn. Either copy or generate auto completion files here, e.g. for Docker.app:cp /Applications/Docker.app/Contents/Resources/etc/docker.zsh-completion ~/.zshfn/_docker cp /Applications/Docker.app/Contents/Resources/etc/docker-compose.zsh-completion ~/.zshfn/_docker-compose rm ~/.zcompdump compinit -Cloads the auto-completion definitions from the.zcompdumpcache, which is automatically re-generated from source after being deleted above. If you wish to optimize the loading, see this GitHub gist, but I think just deleting the file is easier!- The next line enables the auto-complete menu automatically selects the first item (
yes) only forls. To do this even for command line arguments, use':completion:*'but that’s sometimes overload. - Finally, the last line sets the auto-completion to colors.
lsthat comes with macOS (BSD) uses$LSCOLORS, and not$LS_COLORSlike zsh expects. This tool by Geoff Greer convertsLSCOLORS=exfxcxdxbxegedabagacadto the$LS_COLORSstring above!
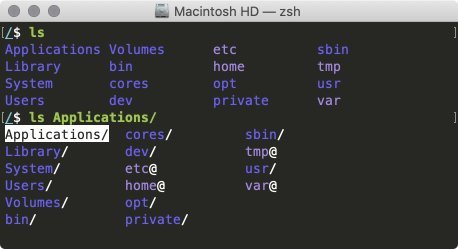
Now, type ls and hit Tab to get this helpful menu:
Even kill supports auto-completion - if you want a menu similar to the one above, zstyle ':completion:*:*:kill:*' menu yes select.
And you can even leverage auto-completions written by others or, write your own!
Aliases
alias l='ls -Fhl' ll='ls -aFhl' dir='ls -aFhl'
alias grep='grep --color=auto' unlock='chflags -R nouchg'
alias darkmode="osascript -e 'tell application \"System Events\" to tell appearance preferences to set dark mode to not dark mode'"
alias -- -='cd -' ...='cd ../..'
alias -s {md,yaml,yml}='open /Applications/Visual\ Studio\ Code.app'
alias -s log='tail -n10'
alias -g 2clip='| pbcopy'
alias -g clip2='pbpaste |'
The first three aliases are quite standard, but the next few lines are new!
- This funny
alias --syntax sets-tocd -. And, I still have an alias to...and you could add more. alias -swill automatically run a program to “open” a file by extension - just “run” the filename directly (e.g.filename.log), and it’ll be aliased totail -n10 filename.log!- You can get really creative with this - in my example, files with markdown (
.md) or YAML extenions will be edited in Visual Studio Code . - And the next two using
alias -gare even stranger, use the alias as part of a command, e.g.ls 2clipwill copy the output oflsto the macOS clipboard (pasteboard)! - Vice versa is to pipe the clipboard contents to another program
clip2 tail.
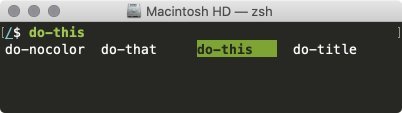
One other tip: sometimes, functions are better than aliases - they work similarly, but a function could do much more, including leveraging zsh features. You could name all your functions with the same prefix, e.g. do-. Since auto-complete even works with functions (and aliases), just type do- and hit tab! The clearest syntax is:
function do-this() { echo "hi" }
function do-that() { echo "bye" }
Command History
Just so you know, there are many ways of interacting and altering the command history. The key commands are:
historylists the command history.!!runs the last command again.!n(wherenis a number) runs the n-th command again.
And if you want to save an entire session’s commands and outputs, script history.txt will do this for you. Note that the colored prompts above will get exported as escape characters! Maybe something like this to reset the prompt and remove ls colors.
function do-nocolor() {
    PROMPT="%~$"
    unset RPROMPT CLICOLOR LESS_TERMCAP_mb \
        LESS_TERMCAP_md LESS_TERMCAP_me LESS_TERMCAP_so \
        LESS_TERMCAP_se LESS_TERMCAP_us LESS_TERMCAP_ue
}
Happy zsh!
Updated 2 Feb 22: Added an alias to unlock files - I get locked files when I copy from a USB storage to macOS - these files cannot easily be deleted without unlocking each file and folder manually. Even when “deleted” to the Bin, they cannot subsequently be simply removed with “Delete immediately...” without manual intervention.