There are many open source packages that require the "AMP" stack comprising Apache, MySQL and PHP (hence "WAMP" for Windows-Apache-MySQL-PHP and "MAMP" for macOS-Apache-MySQL-PHP). Since macOS 10.12 Sierra already includes Apache 2.4 and PHP 5.6, here's how to add MySQL 5.7.
Install MySQL
To start, download MySQL Community edition for OS X as a .DMG archive.
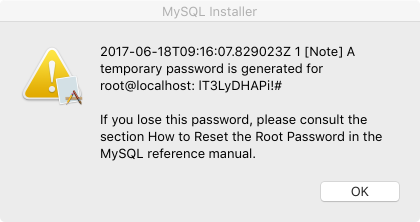
Double click the archive, and then double click the .PKG installer. I accepted all defaults... and finally got to this screen: It's vital to a get a screenshot or copy the default password!
Once installed, go ahead and start up MySQL. Start the System Preferences > MySQL Preferences Pane and hit Start MySQL Server. You can choose if you want to automatically start MySQL with your mac.

Change MySQL Root Password
Next, login to the MySQL database and change the default root password. From the Terminal prompt start the MySQL client mysql. You will be prompted to enter the temporary password - enter what you captured during the installation previously:
export PATH=$PATH:/usr/local/mysql/bin
mysql -uroot -p
If the password is correct, you'll get to the MySQL prompt e.g.:
Welcome to the MySQL monitor.  Commands end with ; or \g.
Your MySQL connection id is 82
Server version: 5.7.18 MySQL Community Server (GPL)

Copyright (c) 2000, 2017, Oracle and/or its affiliates. All rights reserved.

Oracle is a registered trademark of Oracle Corporation and/or its
affiliates. Other names may be trademarks of their respective
owners.

Type 'help;' or '\h' for help. Type '\c' to clear the current input statement.

mysql>
Before you can do anything else, you are forced to change the temporary password. Run these commands to change the password to pass (or anything else you want):
ALTER USER 'root'@'localhost' IDENTIFIED BY 'pass';
FLUSH PRIVILEGES;
QUIT;
I'm not concerned with security, so from now on, I simply log in with mysql -uroot -ppass. There is no space in the argument -ppass.
Create a Database
The application I was installing provided a SQL script to create tables, but first I had to create a database. The MySQL documentation describes this, but it's really simple. Running the mysql client again:
CREATE DATABASE mydatabase;
QUIT;
From now on, to start the MySQL client on the mydatabase database, the console command is mysql -uroot -ppass mydatabase.
Now, I can run the SQL commands provided by the application, which creates tables, indexes and seed data. Assuming the script is called batch-file.sql, this is how to "run" it:
mysql -uroot -ppass mydatabase < batch-file.sql > mysql.outReview mysql.out to validate that all commands completed successfully and without errors.
Enable MySQL in PHP.INI
If you have not already started Apache with PHP, read my previous post to enable Apache and PHP.
Next, to enable a PHP library (driver) for MySQL. The MySQL PHP API documentation describes the three drivers to choose from - mysqli, PDO_MySQL or mysql (deprecated in PHP 5.5).
To do so, edit php.ini in /private/etc. You have to be administrator and the file is read-only by default.
;extension=php_mysql.dll
extension=php_mysqli.dll
;extension=php_pdo_mysql.dll
There are other settings, but for me, the defaults are sufficient.
Once you re-start Apache (apachectl -k restart), you should check the MySQL driver settings. My previous post used a simple phpinfo.php file to do this:

Edit Bash Profile
Finally, if you're expecting to use the MySQL command line tools like mysql or mysqladmin often, you should edit your .bash_profile to permanently add MySQL to your PATH (as shown above), or create aliases to these commands as described in the MySQL installation guide:
alias mysql=/usr/local/mysql/bin/mysql
alias mysqladmin=/usr/local/mysql/bin/mysqladmin
Conclusion
Once of the reasons I use a mac is that it's based on a UNIX core, and it's easy to get many open source packages running. Along with my previous post on enabling the "built-in" Apache and PHP, this post describes getting MySQL up and running.